Showing posts with label Tech Zone. Show all posts

Create Contact Page In Blogger


1. Go to Emailmeform and click the signup button on the page.
3. Now write all the information they ask from you and press Signup button.
4. An activation email will be sent to your inbox. Go to your inbox and activate your new account.
5. Now again go to Emailmeform.com and login there.
7. After login, click Add Form button on the top right of your page.
8. Now you have 2 options to select. Then select the first option: Go to the Template section .....
9. Now your form will be in front of you. Click the Customize button on the page.
10. Edit your form on the left side of the page. After you have done editing click Save Form below the page.
11. Then a small window will open. There will be 4 options. Click to the option which says Take me back to the form manager.
12. Now you will see a many options like Edit, View, Data.... Click to the option Code.
13. You will see 4 options on the left side of the page. Click HTML with Javascript / CSS.
14. Now copy all the code and save it anywhere on your disk.
15. Now login to blogger and go to the Posting > Edit Pages and click New Page.
16. Click Edit HTML button on the page and paste all the code you copied.
17. Now click Compose button on the right side of Edit HTML button.
18. Set the title of your page and publish it.

Now you can check your new contact form on the contact page of your blog.
Read More... Create Contact Page In Blogger

Add Photos to Gmail Messages

Gmail's rich-text editor has never been very powerful, especially if you look at other web applications like Google Docs or Zoho. An important missing feature is inserting images in a message: you can attach photos, but they're usually displayed at the bottom of the message and not all mail clients show thumbnails. One workaround was to upload the images to a website, open it in a different window and then drag it to Gmail's editor.

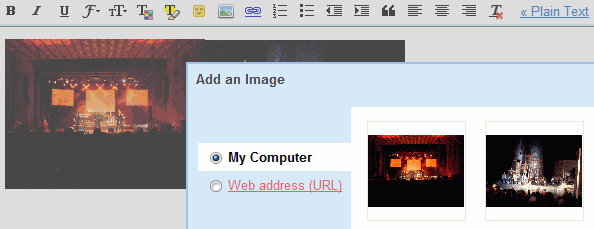
Now you no longer have to do this since Gmail added inserting images as a Labs feature. After enabling the feature, you'll notice a new photo icon when you compose a message using the rich editor. You can insert images from your computer and images published online, by typing their addresses. Unfortunately, Gmail doesn't use the new Flash uploader, so you can't select more than one photo at a time.

"Keep in mind that Gmail doesn't show URL-based images in messages by default to protect you from spammers, so if you're sending mail to other Gmail users, they'll still have to click Display images below or Always display images from ... to see images you embed," mentions the Gmail blog.


To enable the new feature, go to Gmail Labs, search for "inserting images", select the "Enable" radio button and don't forget to click on "Save changes".

Tip: if the uploaded image is too large, click on it and choose from the available sizes (small, medium, large) or resize the image by dragging one of the corners.
{ Thanks, Sungsah. }
Read More... Add Photos to Gmail Messages

HOW TO DELETE A PAGE ON GOOGLE PLUS


1. To delete a page on Google Plus you need to login to your Google plus account


2. Place the mouse pointer on More in the left hand side and select Pages 


3. Now place the mouse pointer on your page image so that Settings and Managers will appear


4. Now click on Settings 


5. Now scroll down to see Delete Page

 
6. Click on Delete Page
7. Click Yes if you want to delete your page


8. After clicking on Yes your page will be deleted immediately.
Read More... HOW TO DELETE A PAGE ON GOOGLE PLUS

How to change your Facebook Timeline?


1. To change your Facebook timeline first you need to login to your Facebook account.  
2. Open browser's new tab and type http://www.facebook.com/about/timeline 
3. Click on Get Timeline
4. Click on Take a Tour
5. Next Cover >> Views >> Activity Log >> Stories >> Star Hide or Add
6.  Click on End Tour
7. Click Add a Cover
8. Select Choose from Photos or Upload Photo
9. Click Save Changes


You can edit later also.


Read More... How to change your Facebook Timeline?

HOW TO UPLOAD MP3 SONGS TO BLOGGER ACCOUNT


Blogger does not have any option to upload mp3 songs to your blogger account. Though you can upload your favorite mp3 song to your blog. To upload any mp3 songs to your blog follow the steps below :::::::: 


1. you must have an account where you can store your mp3 songs. Now a days too many sites provide this facilities. One isopendrive where you can store your mp3 songs. They provide 5GB storage capacity.

Open a Free Account in Opendrive

2. Then upload your mp3 songs in the My Music folder

3. Now right click on your mp3 songs file and clink on Link

4. Copy the HTML Embed code and paste it into your blog's HTML editor.
Read More... HOW TO UPLOAD MP3 SONGS TO BLOGGER ACCOUNT

How To Disable or Block Facebook Notifications To Gmail Account

To block all Facebook notifications to your Gmail Account just follow the steps below :::: 


1. First Login To Your Gmail Account 
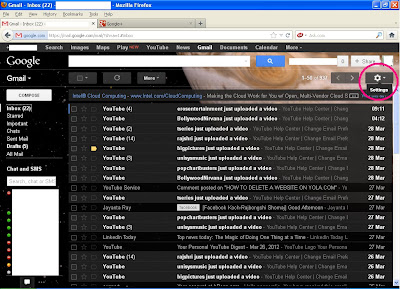
2. Click on the Gear Icon for settings in the right side of top corner 

3. Now select Settings 

4. Select Filters 

5. Click on create a new filter 

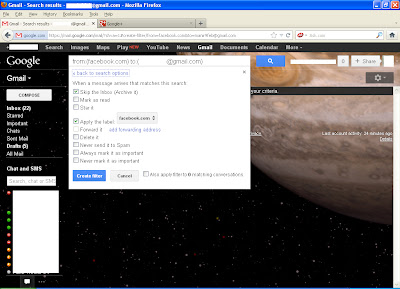
6. Filter dialogue box opens. Type facebook.com against From and type your email ID (example.gmail.com) against To. You can leave blank the others parts 
7. Click on Create filter with this search  

8. Select check box against Skip the Inbox (Archive it) to prevent notifications to go to Inbox and select check box against Apply the label and click on Choose label and then New label to create a label 

9. Type the new label name facebook.com (this is the label where all the facebook notifications come)
10. Click on Create  

11. Select the check box against Also apply filter to 0 matching conversations 
12. Click on Create filter

13. Your label is shown in the red circle in the below image

Read More... How To Disable or Block Facebook Notifications To Gmail Account

How To Reset or Changed Root Password on Red Hat Linux

How do you configure your computer's password on Red Hat when you forget the password? To configure password you need to login in the single user mode. Follow the steps below to configure or reset your password ::::

1.   restart your system
2.   press downward arrow on the keyboard as soon as counting 
      begins to login to your default operating system
3.   if there are multiple operating system installed in your system
      then select the Red Hat operating system
4.   press E on the keyboard to edit the file
5.   select 2nd line by upward and downward arrow i.e., 
      kernel /boot /vmlinuz-2.618........ root=LABEL=/ rhgb quiet
6.   press E on the keyboard to edit the file
7.   press space bar on the keyboard and type single
8.   press Enter on the keyboard
9.   press B on the keyboard
10. type passwd to change the password 
11. type new password
12. press Enter on the keyboard
13. retype the password
14. press Enter on the keyboard
15. type reboot to restart your system
15. type exit

Now your Red Hat password is change 

Read More... How To Reset or Changed Root Password on Red Hat Linux

sam

UNDER THE TITLE OF THE POEM, CLICK